
HandyComfy is built around a simple idea:
Build and manage complex workflows on your PC, then use them through a simple interface on mobile.
You do not need to rebuild ComfyUI inside HandyComfy. Your original workflow, models, custom nodes, and generation process remain on the computer running ComfyUI. HandyComfy reads the workflow and presents only the parts that are useful when you actually want to run it. Understanding this concept will make it much easier to customize HandyComfy for your own ComfyUI environment.
1.How HandyComfy Works
ComfyUI is extremely flexible because almost everything can be represented as a node. That flexibility is very useful while building a workflow on a desktop computer, but the same node graph is not always convenient when you simply want to run that workflow from a phone.
HandyComfy separates these two stages.
1.1 On your PC
Use ComfyUI normally to:
- Build your workflow
- Connect and organize nodes
- Test different models
- Install and use custom nodes
- Adjust samplers, schedulers, and generation parameters
- Create complex image or video pipelines
- Test and debug the workflow
1.2 On your phone
Use HandyComfy to:
- Select a workflow
- Enter or edit prompts
- Choose models
- Change important generation parameters
- Upload images directly from your phone
- Run the workflow
- Check and manage generated results
The actual workflow is still executed by ComfyUI on your PC. HandyComfy simply provides a mobile-friendly interface for controlling it.
Build complex on desktop. Run simple on mobile.
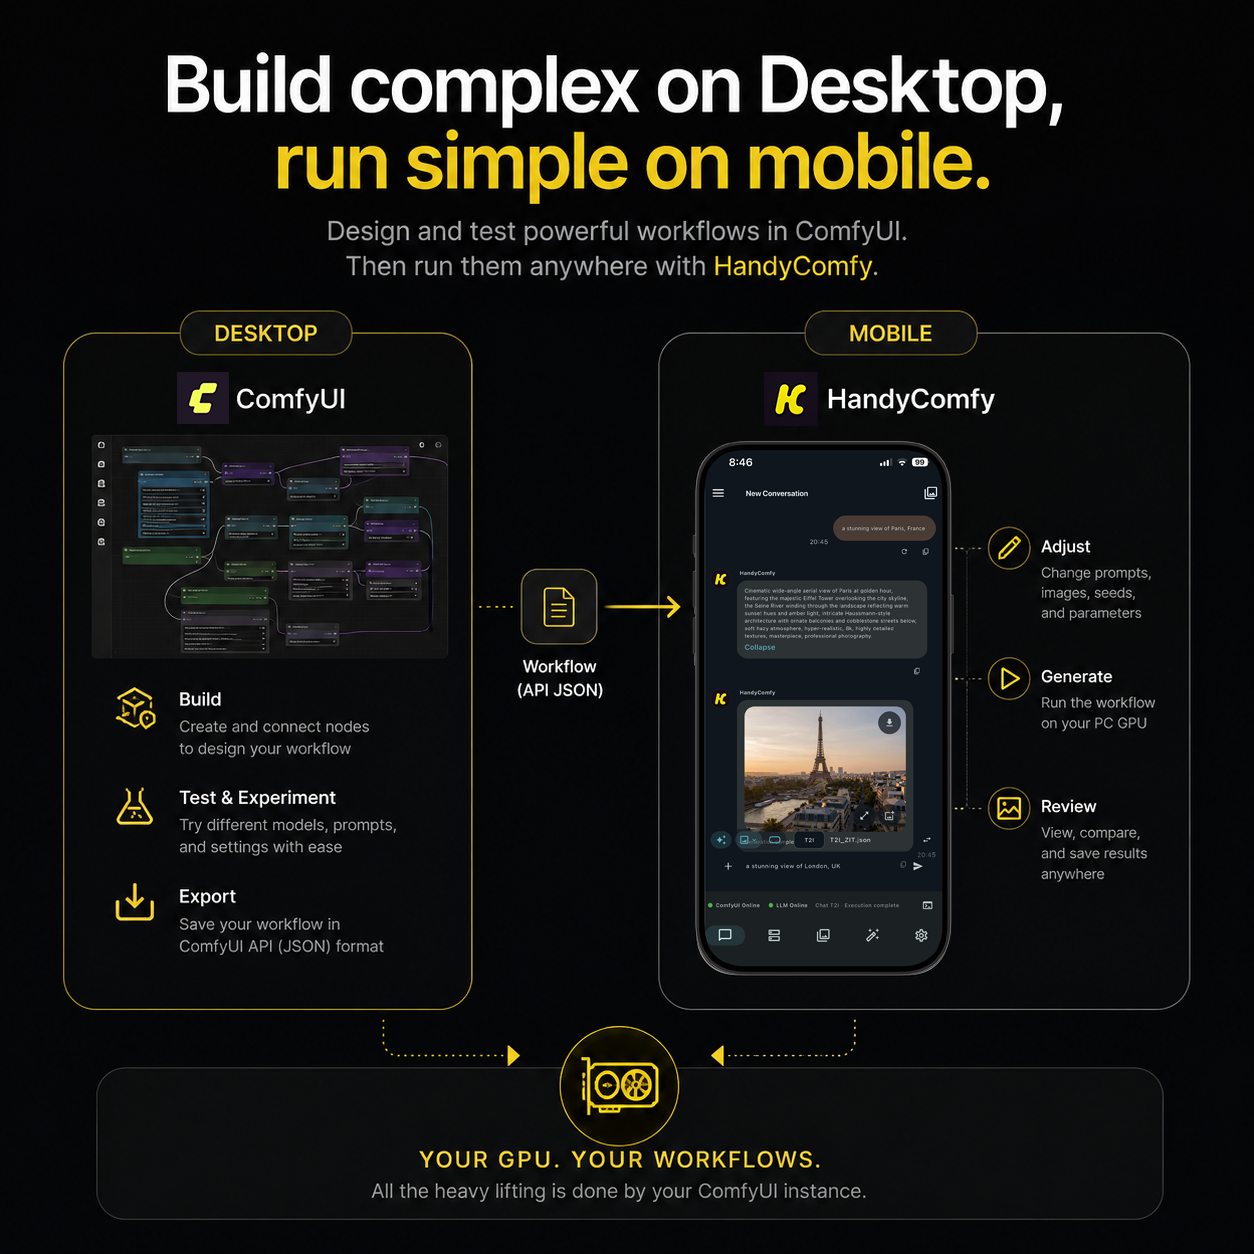
This distinction is important. HandyComfy is not designed to reproduce the entire ComfyUI node editor on a small mobile screen. Instead, it lets you decide which parts of your workflow should become accessible controls on mobile.
2.Workflows
A Workflow in HandyComfy represents a ComfyUI workflow that can be executed from the app.
You can use workflows included with HandyComfy or import workflows that you have created yourself.
Each workflow remains a normal ComfyUI workflow. HandyComfy does not convert it into a different generation system.
Instead, the app reads the workflow’s API JSON and identifies the nodes and parameters that can be exposed through the mobile interface.
2.1 Workflow Management
Open Settings → Workflow Management to view and manage workflows registered in HandyComfy.
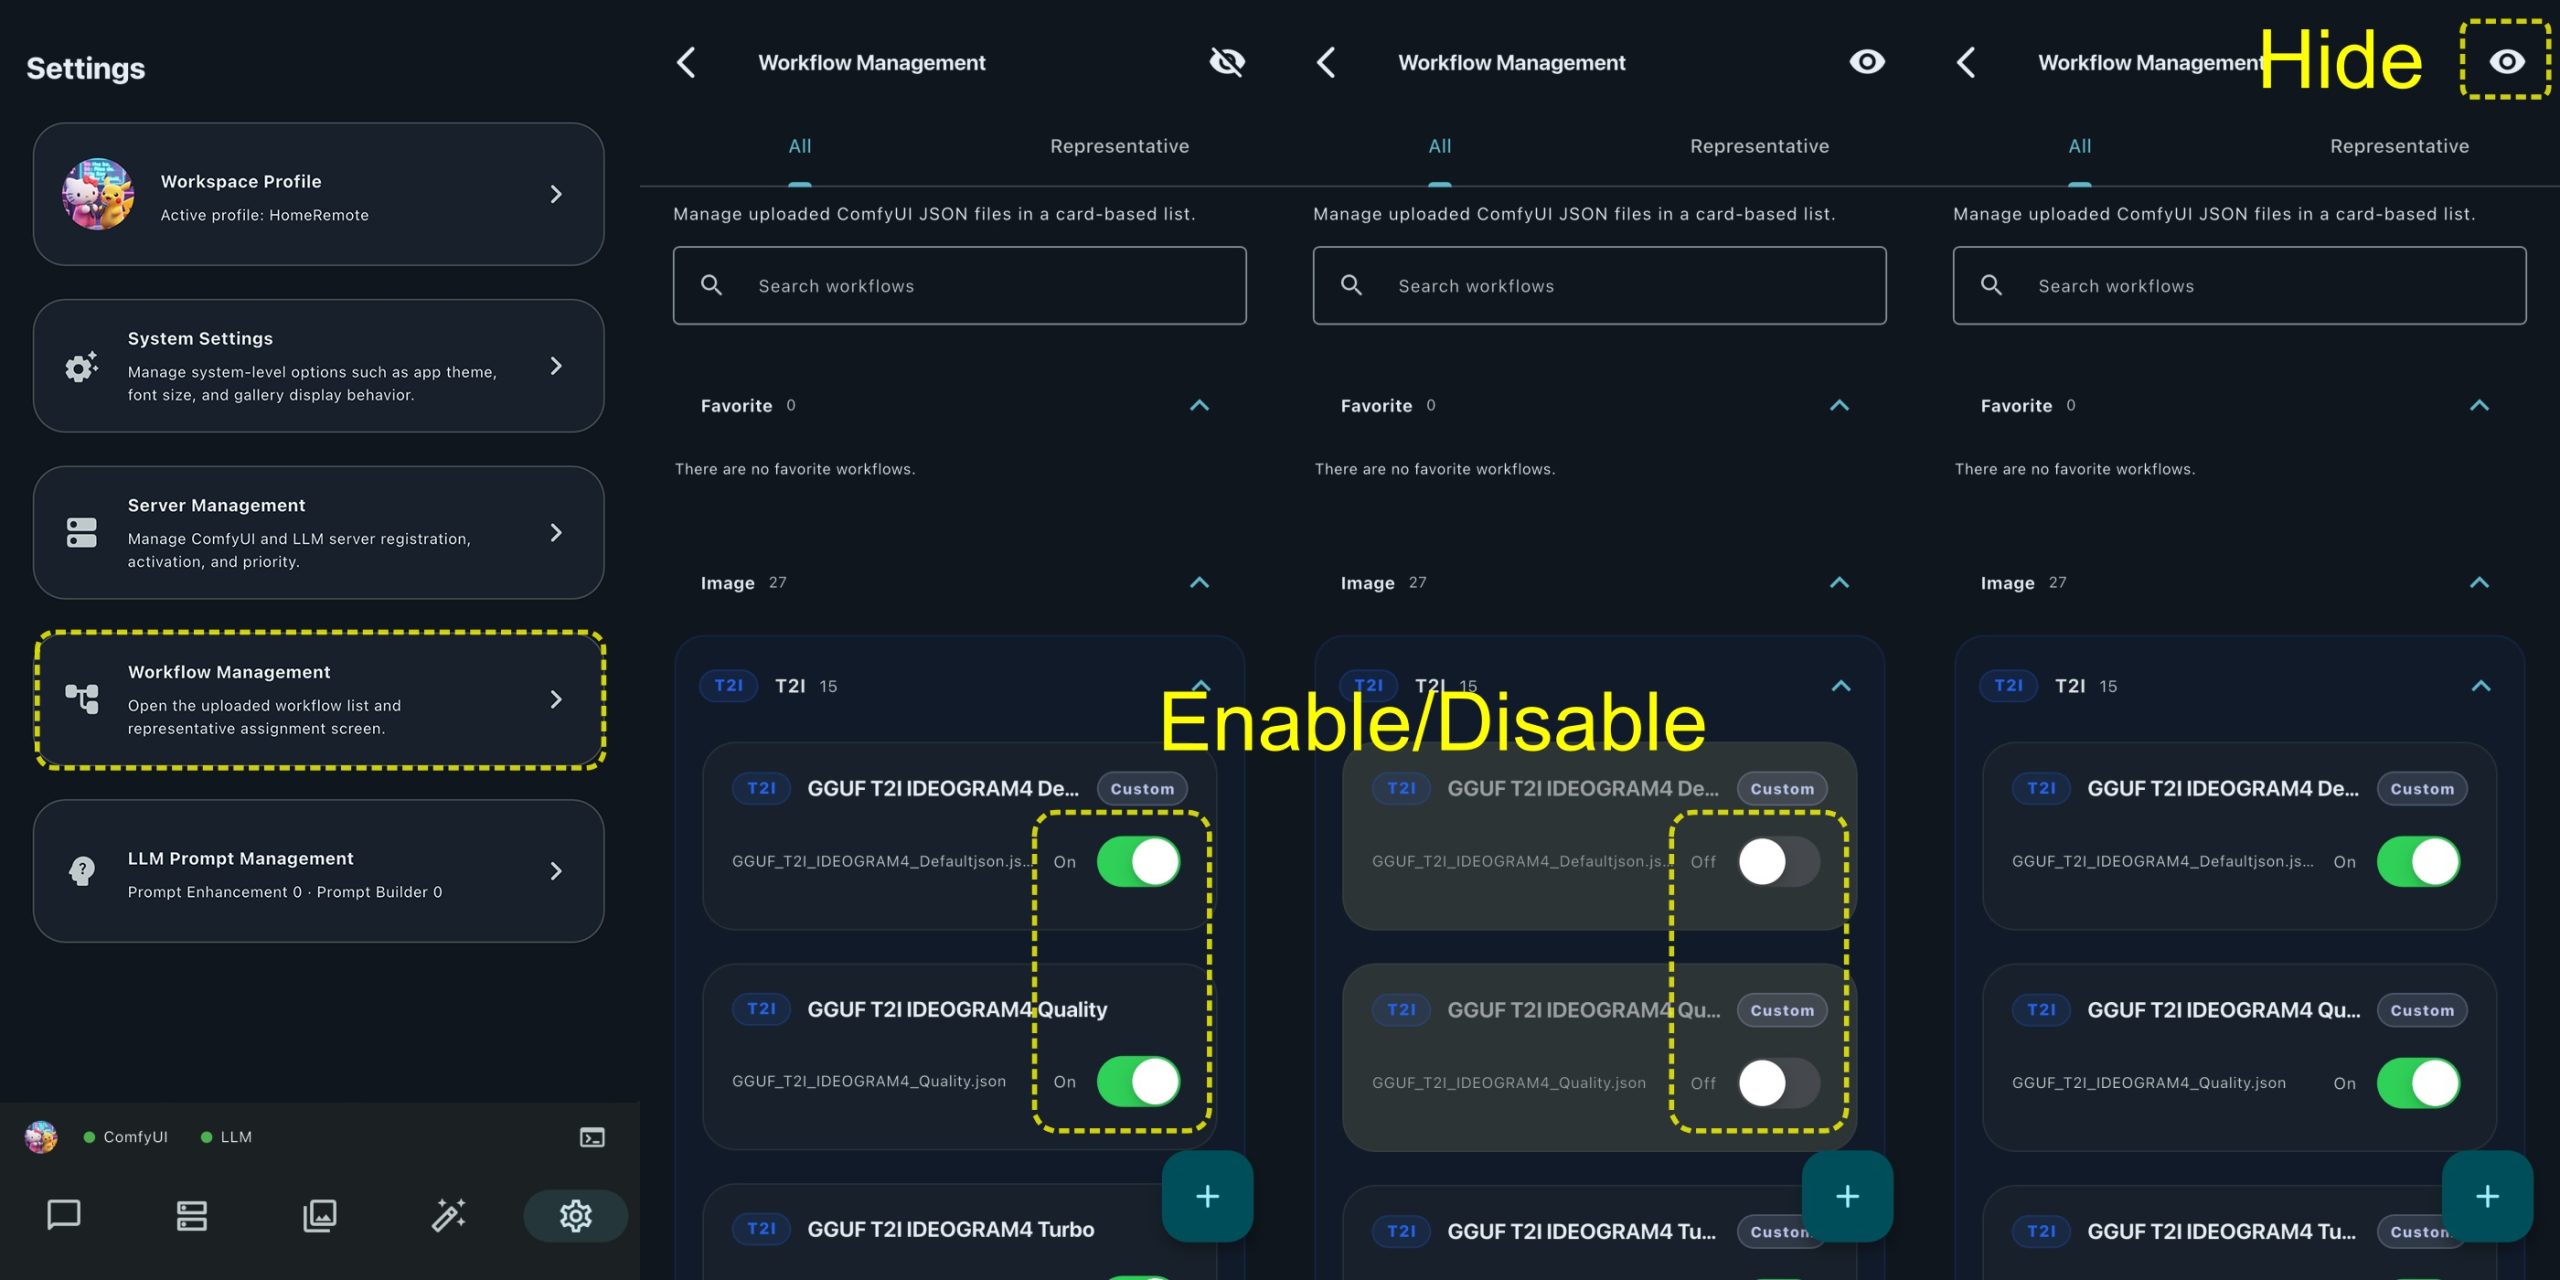
As your workflow library grows, you can control which workflows are enabled, which ones are shown in the app, and which workflows should be used as representative workflows.
Enable / Disable
A workflow can be temporarily enabled or disabled.
This is useful when you want to keep a workflow registered in HandyComfy but do not currently want to use it.
For example, you may have several experimental workflows that you want to keep for later without deleting them completely.
Disabling a workflow is different from deleting it.
The workflow configuration remains stored in HandyComfy and can be enabled again later.
Hide Workflows
As your workflow library grows, you may not want every workflow to appear in the main workflow selection interface.
The Hide option allows you to keep a workflow registered while removing it from normal workflow lists.
This can be useful for:
- Experimental workflows
- Older workflow versions
- Utility workflows
- Workflows used internally by another feature
- Workflows that you rarely execute manually
This allows you to keep your mobile interface clean even when many workflows are registered.
2.2 Representative Workflows
HandyComfy can use a Representative Workflow for each supported generation type.
A representative workflow acts as the default workflow when that function is requested from features such as Chat Mode.
For example, you may have several different Text-to-Image workflows:
- Z-Image Turbo workflow
- KREA 2 Turbo workflow
- Qwen Image workflow
- Experimental workflow
You can keep all of them available in the Workflow tab while choosing one as the representative workflow for Text to Image.
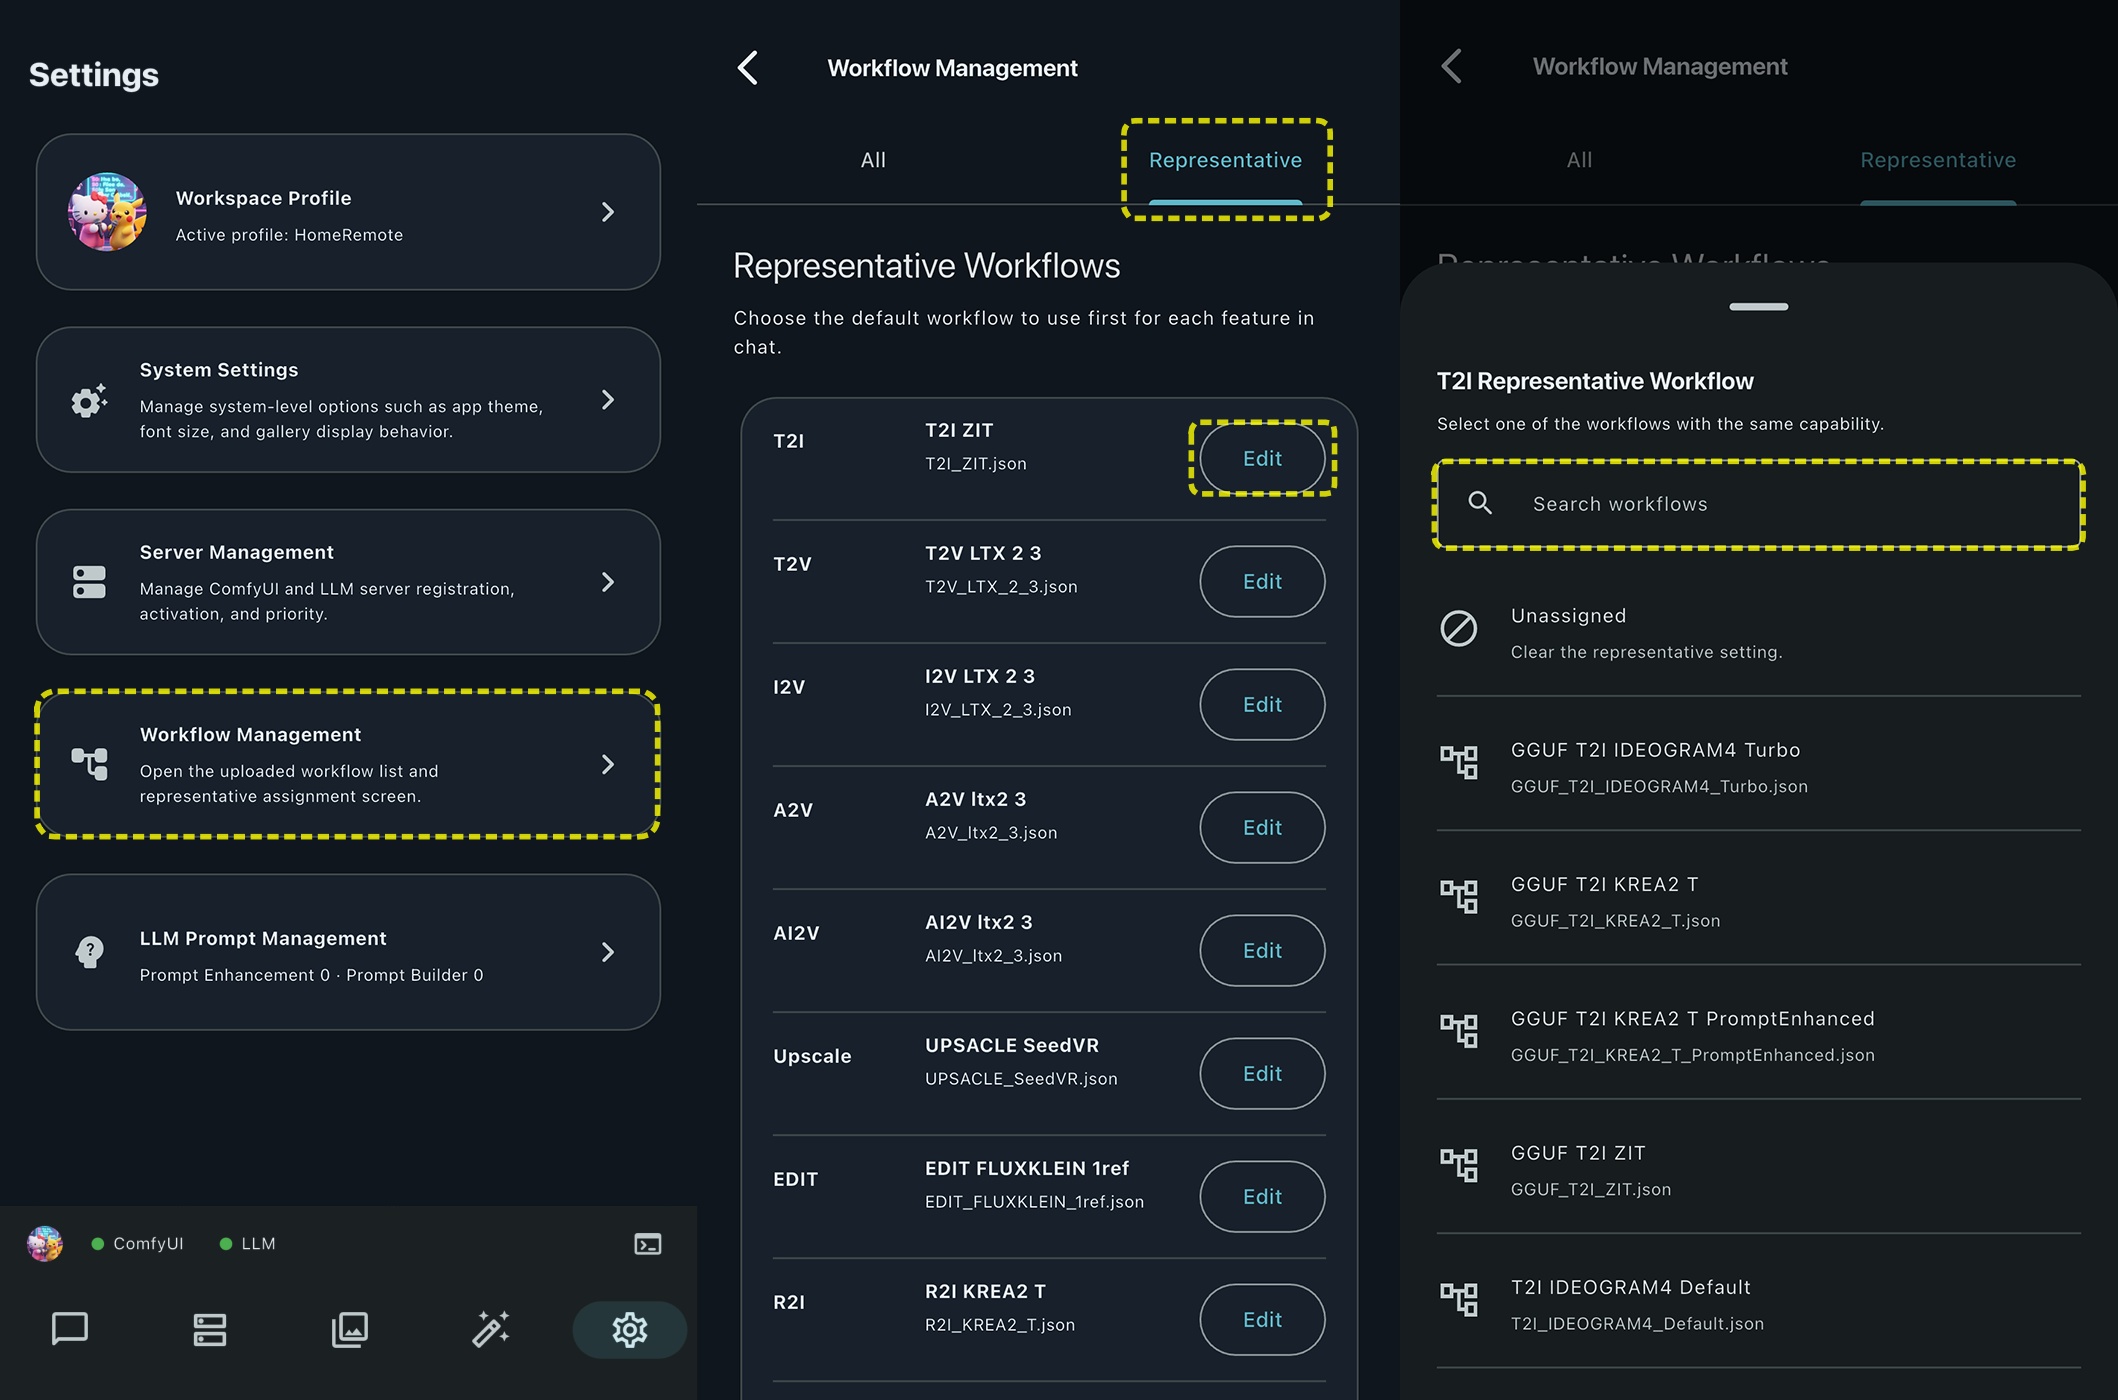
When Text-to-Image generation is requested through Chat Mode, HandyComfy can automatically use that representative workflow.
The representative workflow does not prevent you from manually running other workflows. It simply defines which workflow should be used by default when another HandyComfy feature requests that function.
3.Add, Edit, and Delete Workflows
3.1 Add a Workflow
To add your own workflow, first prepare and test it in ComfyUI.
Before importing it into HandyComfy, make sure the workflow can successfully generate the expected result directly inside ComfyUI.
Then export the workflow in API JSON format.
In HandyComfy:
- Open Settings
- Open Workflow Management
- Tap Add
- Select the exported API JSON file
- Check and configure the detected workflow nodes
- Save the workflow
Once registered, the workflow can be executed directly from HandyComfy.
3.2 Edit a Workflow
After importing a workflow, you can modify how HandyComfy interprets and displays it without changing the original processing logic of your ComfyUI workflow.
Depending on the workflow, you may edit items such as:
- Workflow name
- Workflow type
- Function category
- Node classification
- Input visibility
- Model configuration
- Other HandyComfy-specific settings
This is particularly useful when HandyComfy detects a node correctly but you want it to appear differently in the mobile interface.
3.3 Delete a Workflow
Deleting a workflow from HandyComfy only removes its configuration from the app.
It does not delete the original workflow from your PC, and it does not remove any ComfyUI models or custom nodes.
4.Export & Import — API JSON
This is an important concept when adding your own workflow.
A normal ComfyUI workflow file contains information designed primarily for the visual node editor. HandyComfy needs the workflow in the format used by the ComfyUI API.
Therefore, when importing your own workflow into HandyComfy, use the API JSON version of the workflow.
The API JSON describes the nodes and values that ComfyUI needs when executing the workflow.
HandyComfy reads this structure to identify configurable values and construct the corresponding mobile controls.
The basic process is:
Build your workflow in ComfyUI
↓
Test the workflow
↓
Export as API JSON
↓
Import into HandyComfy
↓
Configure detected nodes
↓
Run from mobile
Recommended:
Always confirm that your workflow runs correctly in ComfyUI before importing it into HandyComfy.
If the original workflow cannot run successfully in ComfyUI,
importing it into HandyComfy will not fix the workflow itself.
5.Node Naming Convention
Node naming is one of the most important concepts when creating workflows for HandyComfy.
A ComfyUI workflow may contain dozens or even hundreds of nodes. HandyComfy therefore needs a way to understand which nodes are intended to become:
- User inputs
- Model selectors
- Output nodes
- Internal workflow nodes
HandyComfy analyzes the workflow automatically, but using consistent node names allows the app to understand your workflow more reliably.
5.1 Why Node Names Matter
Consider a workflow containing several text-related nodes:
- Positive prompt
- Negative prompt
- Internal prompt modifier
- Style text
- Filename prefix
- Metadata text
From the API JSON alone, several of these nodes may simply appear to contain text. HandyComfy needs to know which one should become the main Prompt field shown to the user. This is where node naming conventions become useful.
For example, a node named:
Input_PositivePrompt
can be recognized as the primary positive prompt input.
If the node contains a supported text or value field, HandyComfy can use that field as the prompt value.
Instead of presenting every parameter from the workflow, HandyComfy can now understand that this node is an important user input.
5.2 Input Nodes
Nodes intended to be changed frequently by the user should generally be classified as Input nodes.
Typical examples include:
- Positive prompt
- Negative prompt
- Input image
- Seed
- Steps
- CFG
- Width
- Height
- Denoise
- Boolean options
- Other generation parameters
When detected correctly, these values can appear as normal controls in HandyComfy instead of being buried inside Advanced Settings.
5.3 Model Nodes
Model-related values can be classified separately from ordinary inputs.
Typical examples include:
- Checkpoints
- Diffusion models
- UNET models
- VAE
- CLIP / text encoders
- LoRA
- Upscale models
- Other model files
This distinction is important because model values need to match files that actually exist on the connected ComfyUI server.
As explained in Get Started, model filenames and paths may be different for every user’s ComfyUI environment.
The model names shown in screenshots or example workflows are therefore examples only. You should select the corresponding model that actually exists on your own ComfyUI server.
5.4 Output Nodes
Output nodes tell HandyComfy where to look for generated results.
A workflow may contain several preview or intermediate image nodes, while only one of them represents the final result that should be displayed in the app.
Correctly identifying the output helps HandyComfy determine which generated image or video should be returned to the mobile interface.
5.5 Internal / ETC Nodes
Not every node needs to appear on your phone.
Most nodes inside a complex ComfyUI workflow are part of the internal processing pipeline.
For example:
- Conditioning operations
- Math nodes
- Image processing nodes
- Latent processing nodes
- Utility nodes
- Internal switches
- Custom node logic
These nodes can remain internal.
HandyComfy may classify nodes that are not intended as primary controls as ETC, or display their configurable values under Advanced Settings.
This is intentional.
A workflow may contain 100 nodes while the mobile interface exposes only:
- Prompt
- Input Image
- Model
- Steps
- Seed
The workflow can remain complex even when the mobile interface stays simple.
6.Automatic Detection and Manual Classification
HandyComfy attempts to detect important workflow nodes automatically.
However, ComfyUI workflows can be structured in many different ways, and custom nodes may use different widget names, values, or internal structures.
Because of this, automatic detection may not always identify every node exactly as you intended.
If a node appears under Advanced Settings instead of the main interface, first check its node name and classification.
For example, if a prompt node is not recognized as the primary input, you can:
- Rename the node according to the HandyComfy naming convention and import the workflow again.
- Or manually change its NodeType inside HandyComfy.
For example:
ETC → input
This allows you to decide how HandyComfy should present the node without rebuilding the entire workflow.
7.Example Workflow
When creating your first custom HandyComfy workflow, it is recommended to start with a relatively simple workflow.
For example:
Load Model
↓
Positive Prompt
↓
Negative Prompt
↓
Sampler
↓
VAE Decode
↓
Save Image
Then identify only the values you actually want to control from mobile.
For example:
Input_PositivePromptInput_NegativePrompt- Model
- Seed
- Steps
- CFG
The remaining nodes can stay internal.
When imported into HandyComfy, the same node graph can become a much simpler interface:
- Prompt
- Negative Prompt
- Model
- Seed
- Steps
- CFG
- Generate
This is the core workflow design principle recommended for HandyComfy.
Do not try to reproduce every ComfyUI node on mobile.
Ask yourself:
“Which values do I actually need to change when I run this workflow?”
Expose those values and leave the rest inside the workflow.
8.Using Example Workflows
HandyComfy example workflows can also be useful as references when preparing your own workflows.
In particular, check how important nodes are:
- Named
- Classified
- Connected
- Exposed as user inputs
You do not need to build your workflow exactly like the example.
The purpose of the example is to demonstrate how HandyComfy identifies the parts of a workflow that should become part of the mobile interface.
You can keep your custom nodes and complex processing logic behind those inputs.
9.Workspace Profiles
As your HandyComfy setup grows, you may start using different groups of workflows for different purposes.
For example:
9.1 Image Generation
- FLUX Text to Image
- Image Upscale
- Face Detail
- Image Edit
9.2 Video Generation
- Image to Video
- Text to Video
- Frame Interpolation
9.3 Experimental
- New model tests
- Custom-node workflows
- Development workflows
A Workspace Profile helps keep different working environments organized instead of treating every workflow as part of one large collection.
You can think of a Workspace Profile as a separate working context inside HandyComfy.
For example:
- Daily — workflows you use regularly
- Image — image-generation and editing workflows
- Video — video-generation workflows
- Testing — experimental workflows
Workspace Profiles become increasingly useful as you add more workflows and maintain different working environments.
Rather than keeping every possible workflow visible at the same time, you can organize HandyComfy around how you actually work.
The Core Idea
The most important thing to remember is that HandyComfy does not require you to simplify your ComfyUI workflows.
Your desktop workflow can remain as complex as necessary.
You only need to simplify how you interact with it.
ComfyUI
Build everything.
↓
HandyComfy
Expose what matters.
That means a workflow containing dozens of custom nodes, model loaders, conditioning steps, switches, and processing stages can still become a clean mobile interface with only a few controls.
This is the basic concept behind HandyComfy:
Build complex on desktop.
Run simple on mobile.