
Welcome to HandyComfy!
This guide will walk you through everything you need to start using HandyComfy — from installing the app and connecting your ComfyUI server to generating your first image from your phone.
By the end of this guide, you will be able to:
- Connect HandyComfy to ComfyUI running on your computer
- Optionally connect a local or API-based LLM
- Configure the models installed on your ComfyUI server
- Run your first workflow from HandyComfy
- Test the built-in Chat Mode
1.Introduction
1.1 What is HandyComfy?
HandyComfy is a mobile interface for ComfyUI.
ComfyUI remains installed and running on your computer. Your models, custom nodes, workflows, and GPU stay there as well.
HandyComfy connects to that ComfyUI server and gives you a mobile-friendly interface for running your workflows without having to work with a full node graph on a small screen.
Build complex on desktop. Run simple on mobile.
You can create and test complex workflows in ComfyUI on your PC, then use HandyComfy to run them from your phone with only the controls you actually need.
Important
HandyComfy does not replace ComfyUI and does not run AI models directly on your phone.
A working ComfyUI installation on another computer is required for image or video generation.
[Image: Simple diagram showing Phone / HandyComfy → ComfyUI Server → GPU & Models]
1.2 Download HandyComfy
HandyComfy is available for iOS and Android.
Download and install the app from the store for your device.
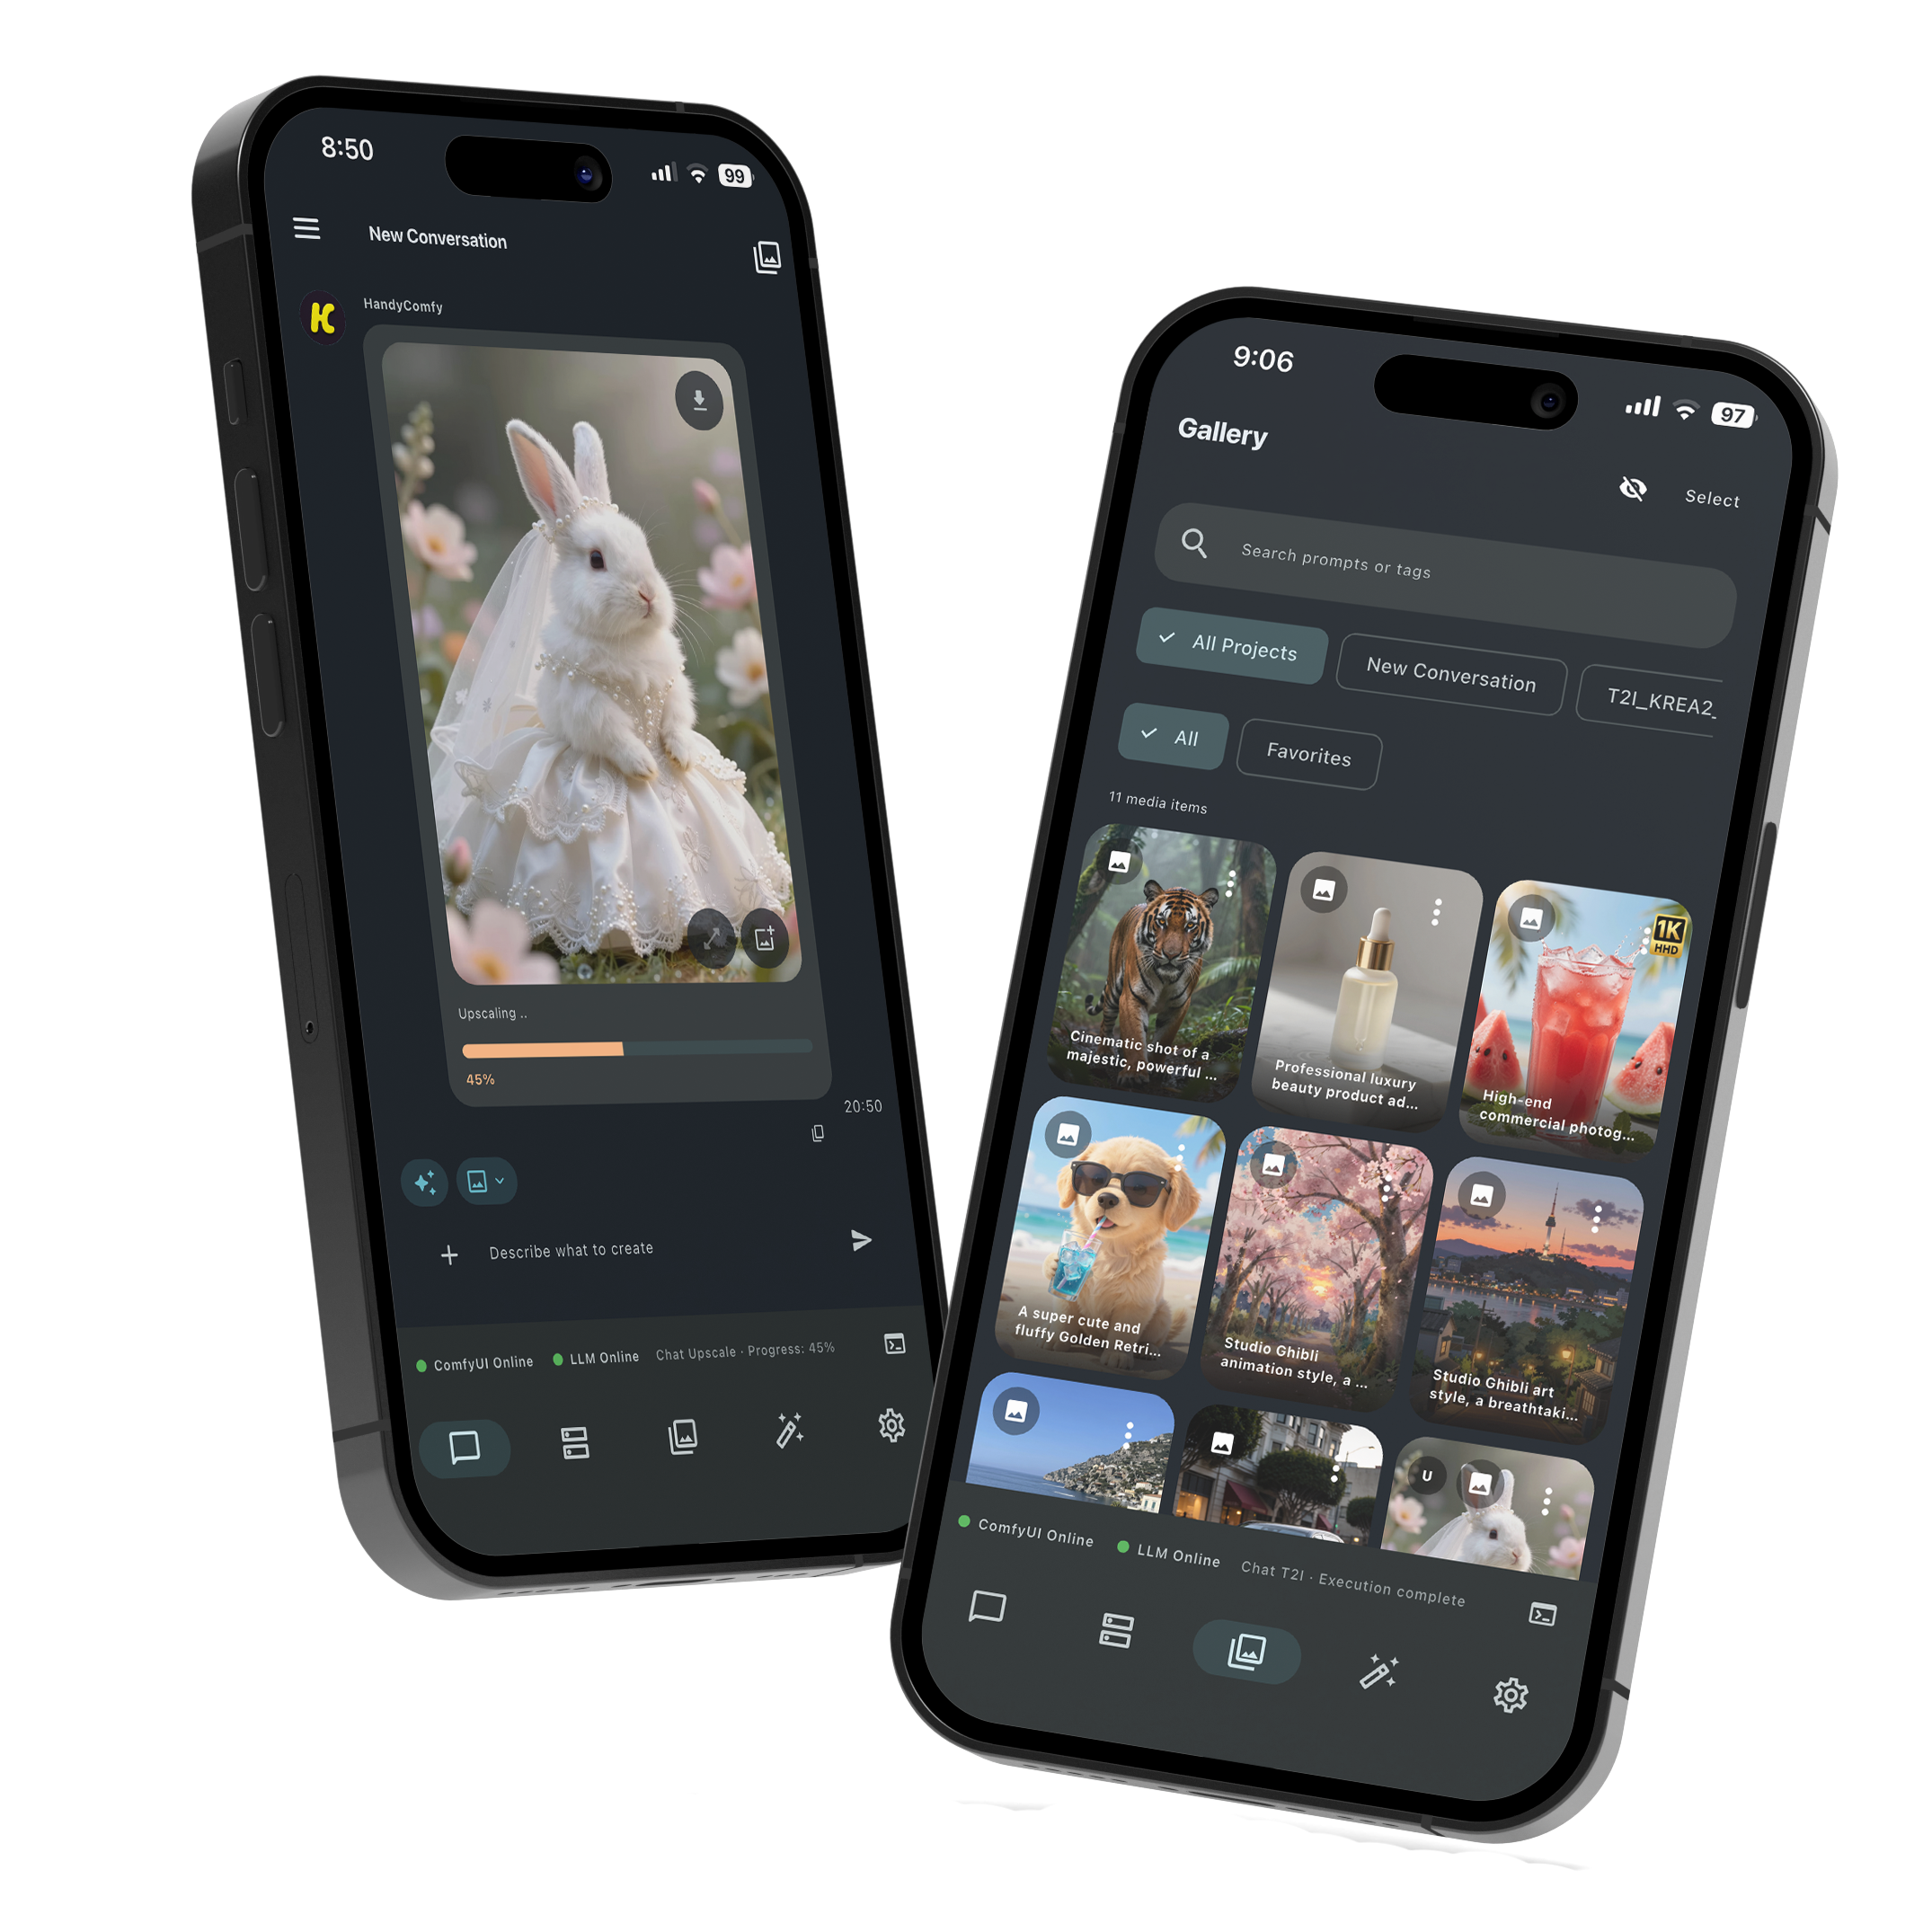


After installation, you can open HandyComfy immediately. Before generating anything, however, you need to make your ComfyUI server accessible to the app.
2.Server Setup
HandyComfy can communicate with two types of AI servers:
✅ ComfyUI Server
Required for running image and video generation workflows.
✅ LLM Server / API (Optional)
Used for LLM-powered features such as Chat Mode and prompt-related assistance.
You can use HandyComfy with ComfyUI only. An LLM connection is not required for basic image or video generation.
2.1 ComfyUI Server Setup
By default, ComfyUI listens only on the computer on which it is running. The standard local address is 127.0.0.1:8188.
To connect from your phone, start ComfyUI with the --listen option so that it can accept connections from other devices on your network. ComfyUI officially supports --listen for LAN access; its default port is 8188.

Windows Portable Version
If you are using the Windows Portable version of ComfyUI, locate the batch file you normally use to launch ComfyUI.
For example:run_nvidia_gpu.bat
Open the file with a text editor and add --listen to the ComfyUI startup command.
Example:.\python_embeded\python.exe -s ComfyUI\main.py --listen --windows-standalone-build pause
This is also the method described in the official ComfyUI documentation for enabling LAN access in the Windows Portable version.
Save the file and launch ComfyUI again.
Manual Installation
If you normally start ComfyUI from a terminal, you can add the same option to the commandpython main.py --listen
or explicitly:python main.py --listen 0.0.0.0
ComfyUI accepts both forms for listening on network interfaces.
Find Your PC Address
Your phone now needs an address that points to the computer running ComfyUI.
When both devices are on the same local network, this will usually look similar to:http://192.168.0.10:8188
The exact IP address will be different on every network.
Enter this address when adding your ComfyUI server in HandyComfy.
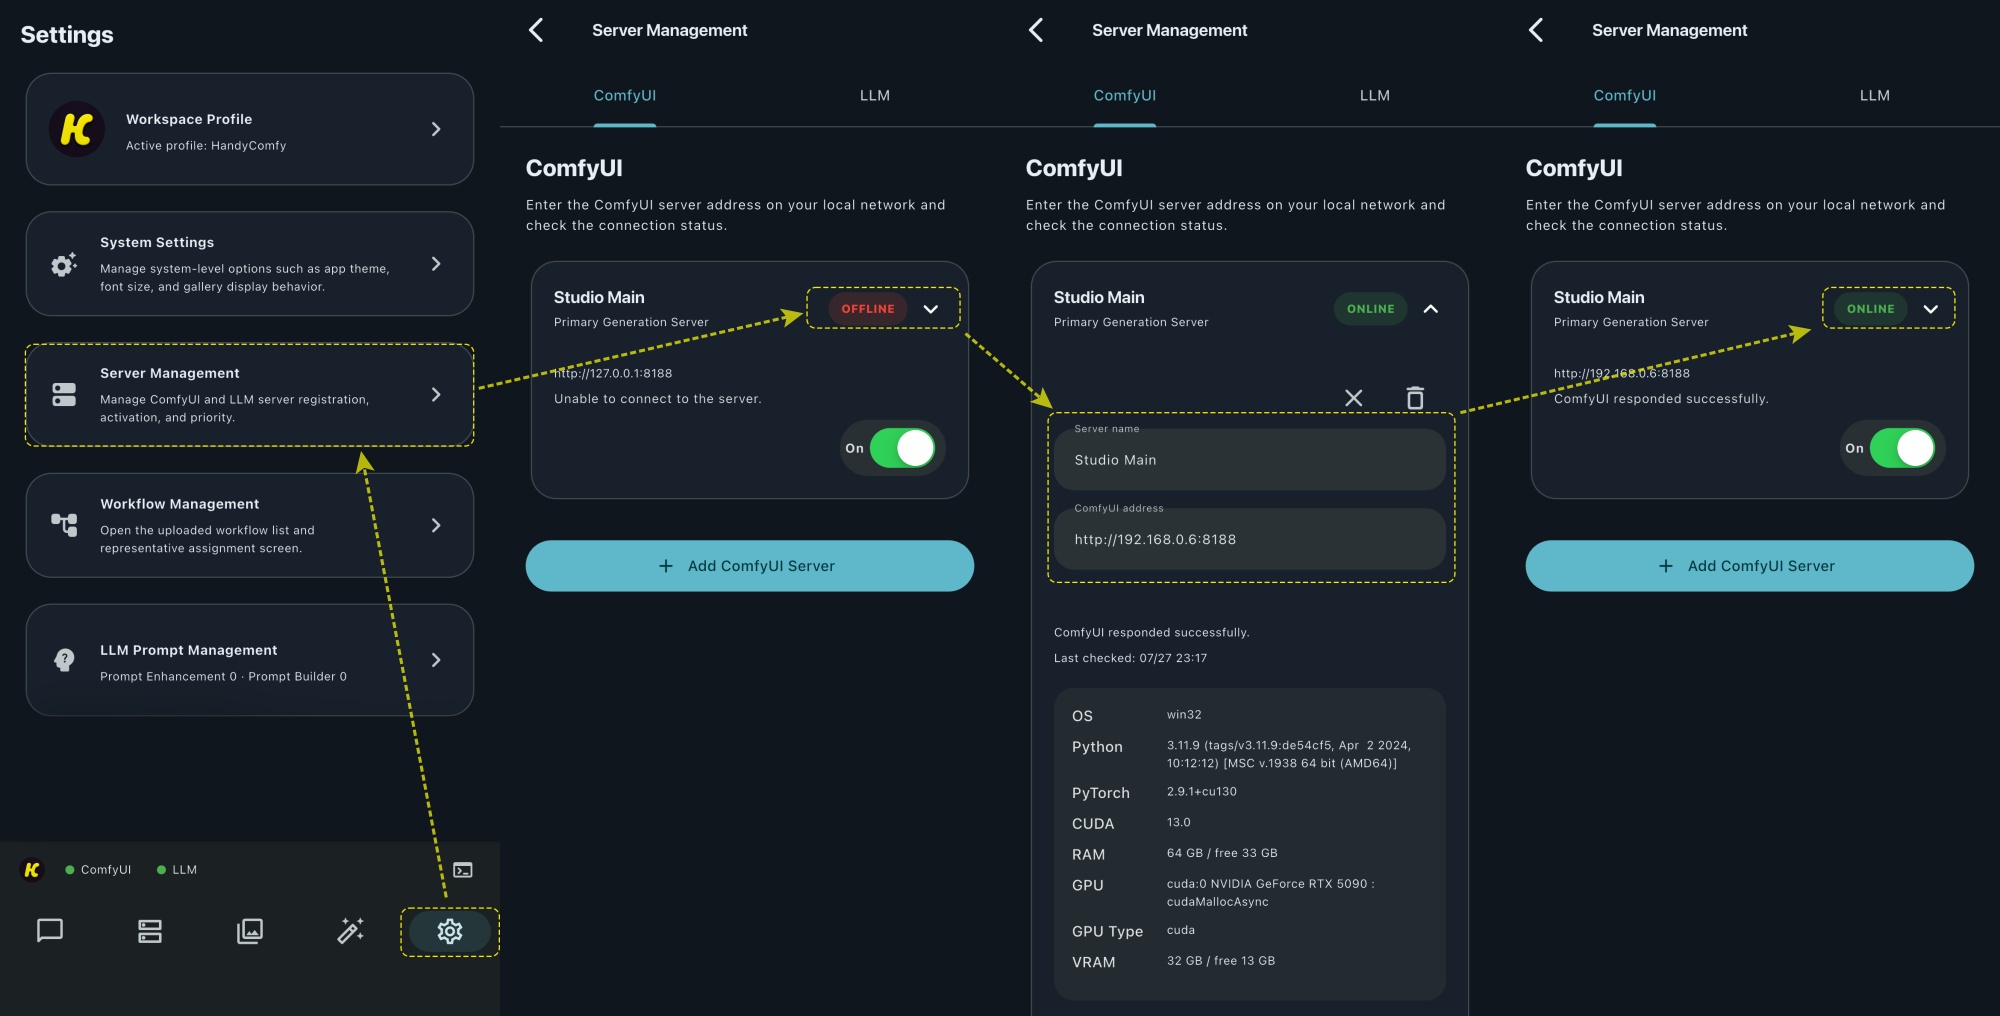
Once added, use the connection test in HandyComfy to make sure the server can be reached.
If the connection fails
Make sure:
- ComfyUI is currently running.
- ComfyUI was started with
--listen.- The IP address and port are correct.
- Your phone and PC are connected to the same network.
- Your firewall is not blocking ComfyUI.
Firewall and port settings are among the connection checks recommended by the official ComfyUI troubleshooting guide.
2.2 LLM Server Setup (Optional)
An LLM connection is optional.
If you only want to run ComfyUI workflows, you can skip this section and continue directly to Quick Start.
HandyComfy can use either:
- A local LLM running through Ollama
- A supported external AI service using an API key
Ollama (Local)
Ollama is useful when you want to run your LLM locally on your own computer.
First, install Ollama and make sure the model you want to use is already available.
For example, you can check your installed models from a terminal:ollama list
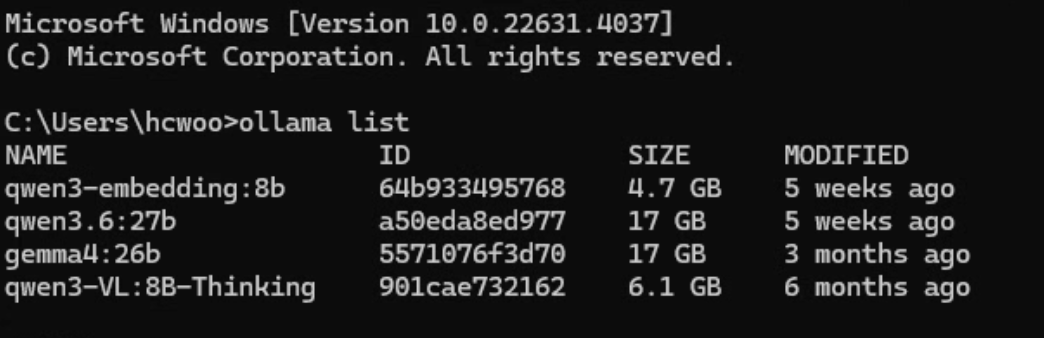
Like ComfyUI, Ollama normally listens only on the local computer. By default, Ollama binds to 127.0.0.1:11434.
To allow HandyComfy on another device to connect, configure Ollama to listen on your network using:OLLAMA_HOST=0.0.0.0:11434
Ollama’s official documentation specifies OLLAMA_HOST as the setting used to change the server bind address.
Windows
Quit Ollama completely first.
Open Environment Variables in Windows and create or edit the following user environment variable:Variable name: OLLAMA_HOST Variable value: 0.0.0.0:11434
Then start Ollama again.
macOS
When using the Ollama macOS application, the environment variable can be set with:launchctl setenv OLLAMA_HOST "0.0.0.0:11434"
Restart the Ollama application afterward.
Linux
For an Ollama installation running as a systemd service, configure the service environment with:Environment="OLLAMA_HOST=0.0.0.0:11434"
Then reload systemd and restart Ollama.
These platform-specific methods follow Ollama’s current official server configuration instructions.
Now add the Ollama server to HandyComfy.
A local-network address may look like:http://192.168.0.10:11434
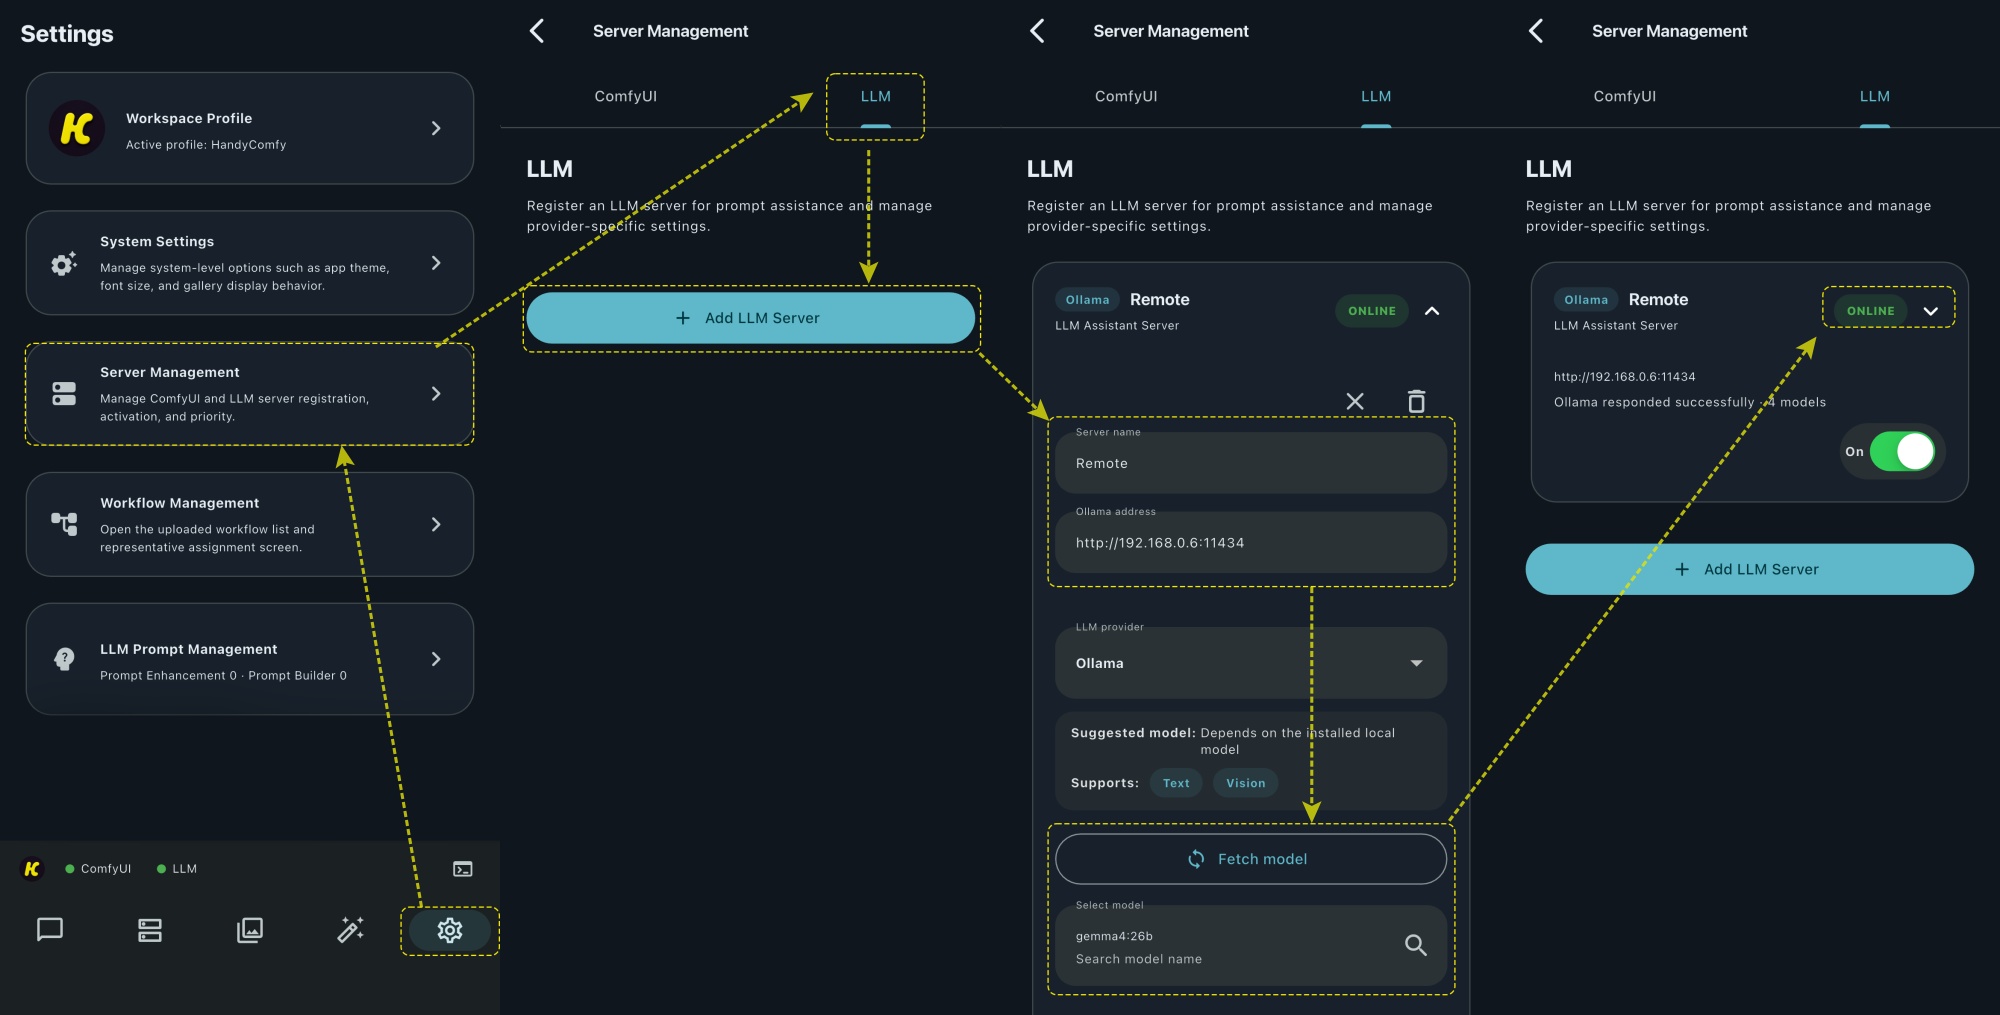
Select the Ollama model you want HandyComfy to use and test the connection.
Note
Your Ollama model is separate from your ComfyUI image-generation models.
The LLM is used for language-based features, while ComfyUI performs the actual image or video workflow execution.
Cloud API Services
Instead of running an LLM locally, you can connect HandyComfy to a supported external AI service.
The exact setup depends on the provider, but the general process is:
- Create an account with the AI service you want to use.
- Generate an API key from that provider.
- Open the LLM settings in HandyComfy.
- Select the corresponding provider.
- Enter your API key.
- Select or enter the model you want to use.
- Test the connection.
Keep your API key private
An API key gives applications access to your account with that provider. Never post it publicly or include it in screenshots, bug reports, or support emails.
Usage fees, rate limits, available models, and data-processing policies are determined by the external provider you choose.
Once the connection succeeds, you are ready to use HandyComfy’s LLM-powered features.
3.Quick Start (First Generation)
Now let’s generate your first image.
Before continuing, make sure:
ComfyUI is running on your PC and HandyComfy successfully connects to your ComfyUI server.
You do not need an LLM connection for this part.
3.1 Model setting
This is one of the most important steps when using HandyComfy for the first time.
HandyComfy runs workflows on your own ComfyUI installation. This means the model files available on your server depend entirely on what you have installed on your PC.
For example, one user might have:flux1-dev-fp8.safetensors
while another user may have a completely different checkpoint, UNet, VAE, CLIP, LoRA, or model directory structure.
The model names shown in this manual are examples only.
Do not copy a model name from a screenshot simply because it appears in this guide.
You must select a model that actually exists on your ComfyUI server.
Open the Model Settings in HandyComfy.
HandyComfy will search the connected ComfyUI server for the models required by its supported workflows.
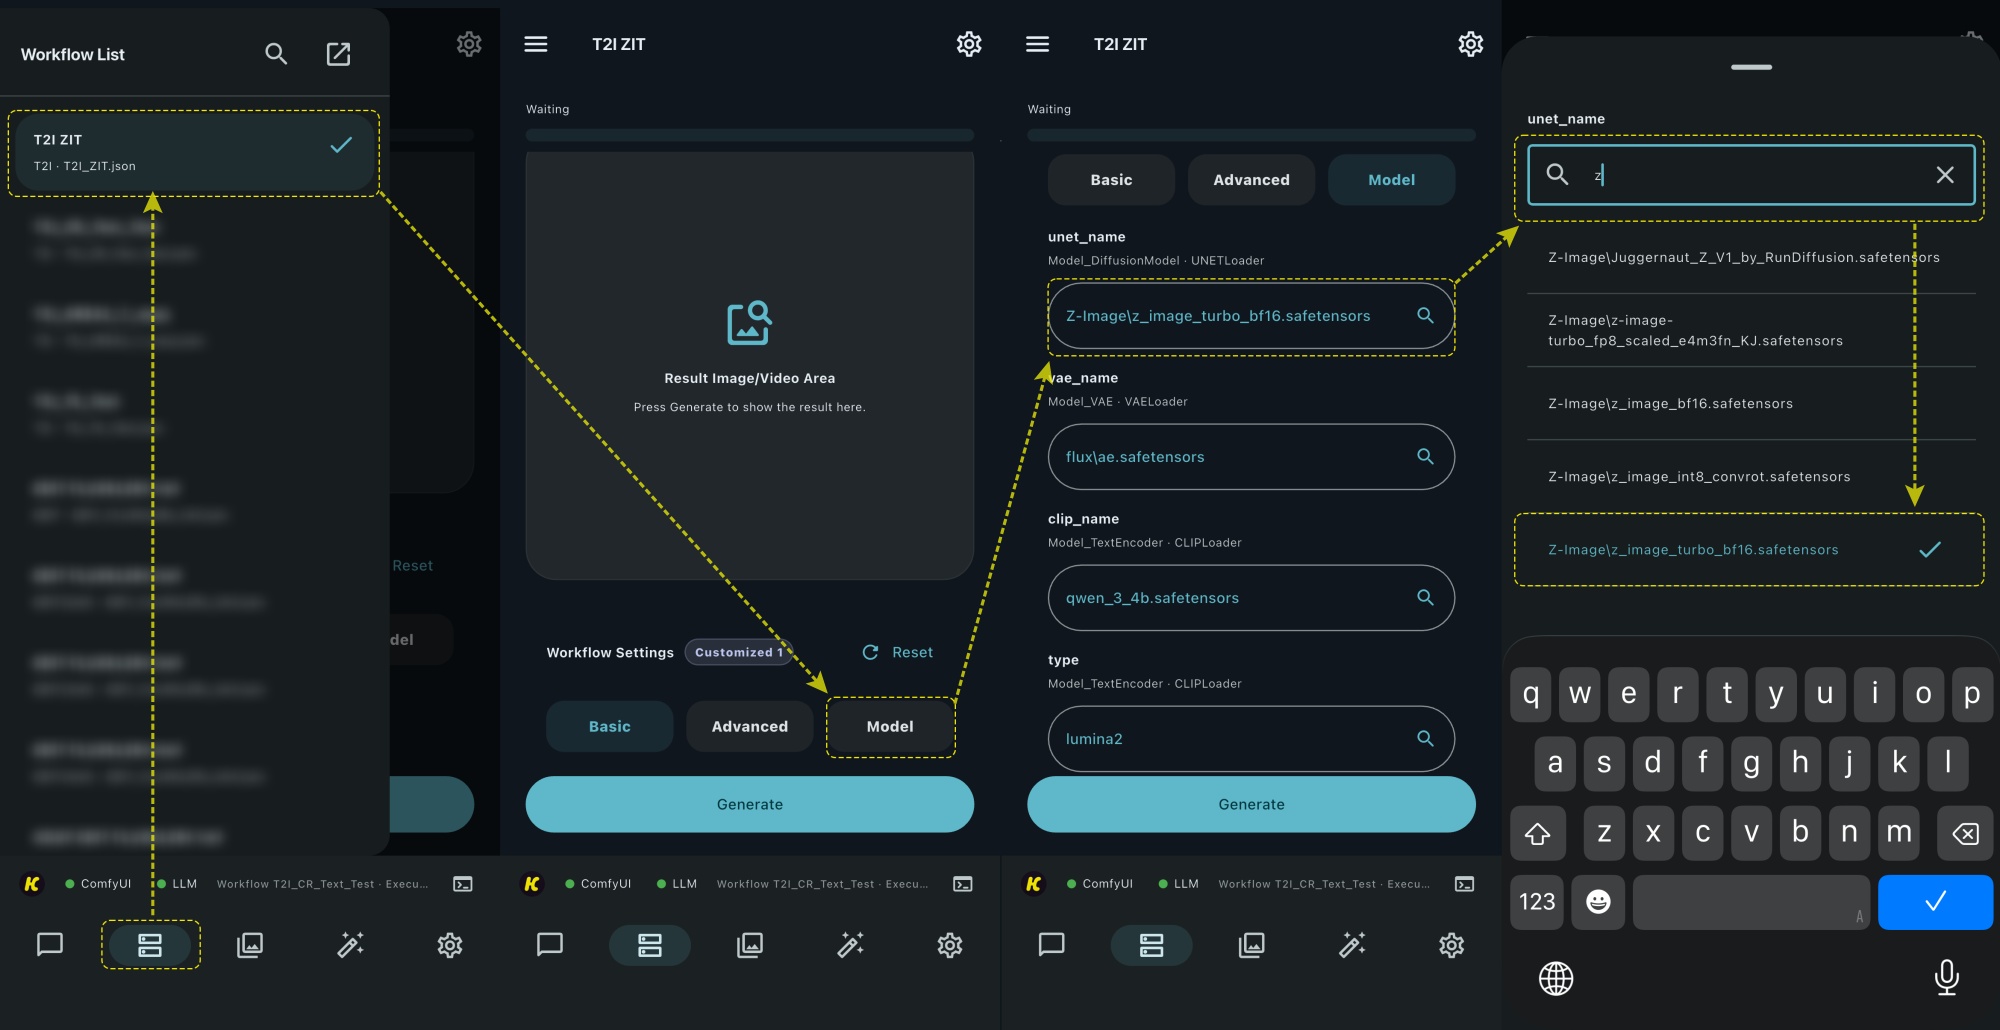
Run the model search or refresh the available models.
Then assign the appropriate models installed on your server to each required model field.
Depending on the workflow, this may include items such as:
- Checkpoint / diffusion model
- Text encoder
- VAE
- LoRA
- Upscale model
- Other workflow-specific models
Why do my model names look different from the manual?
This is completely normal.
ComfyUI users can install different models and organize them in different locations. HandyComfy therefore cannot assume that every user has the same filenames or model paths.
Always select models based on what is actually installed and working in your own ComfyUI environment.
Once all required models have been assigned, save your settings.
3.2 Run Your First Workflow
Now return to the generation screen.
Choose a simple image-generation workflow for your first test.
Enter a basic prompt, for example:A cinematic photograph of a small cabin beside a quiet lake at sunrise, soft morning mist, natural light, highly detailed
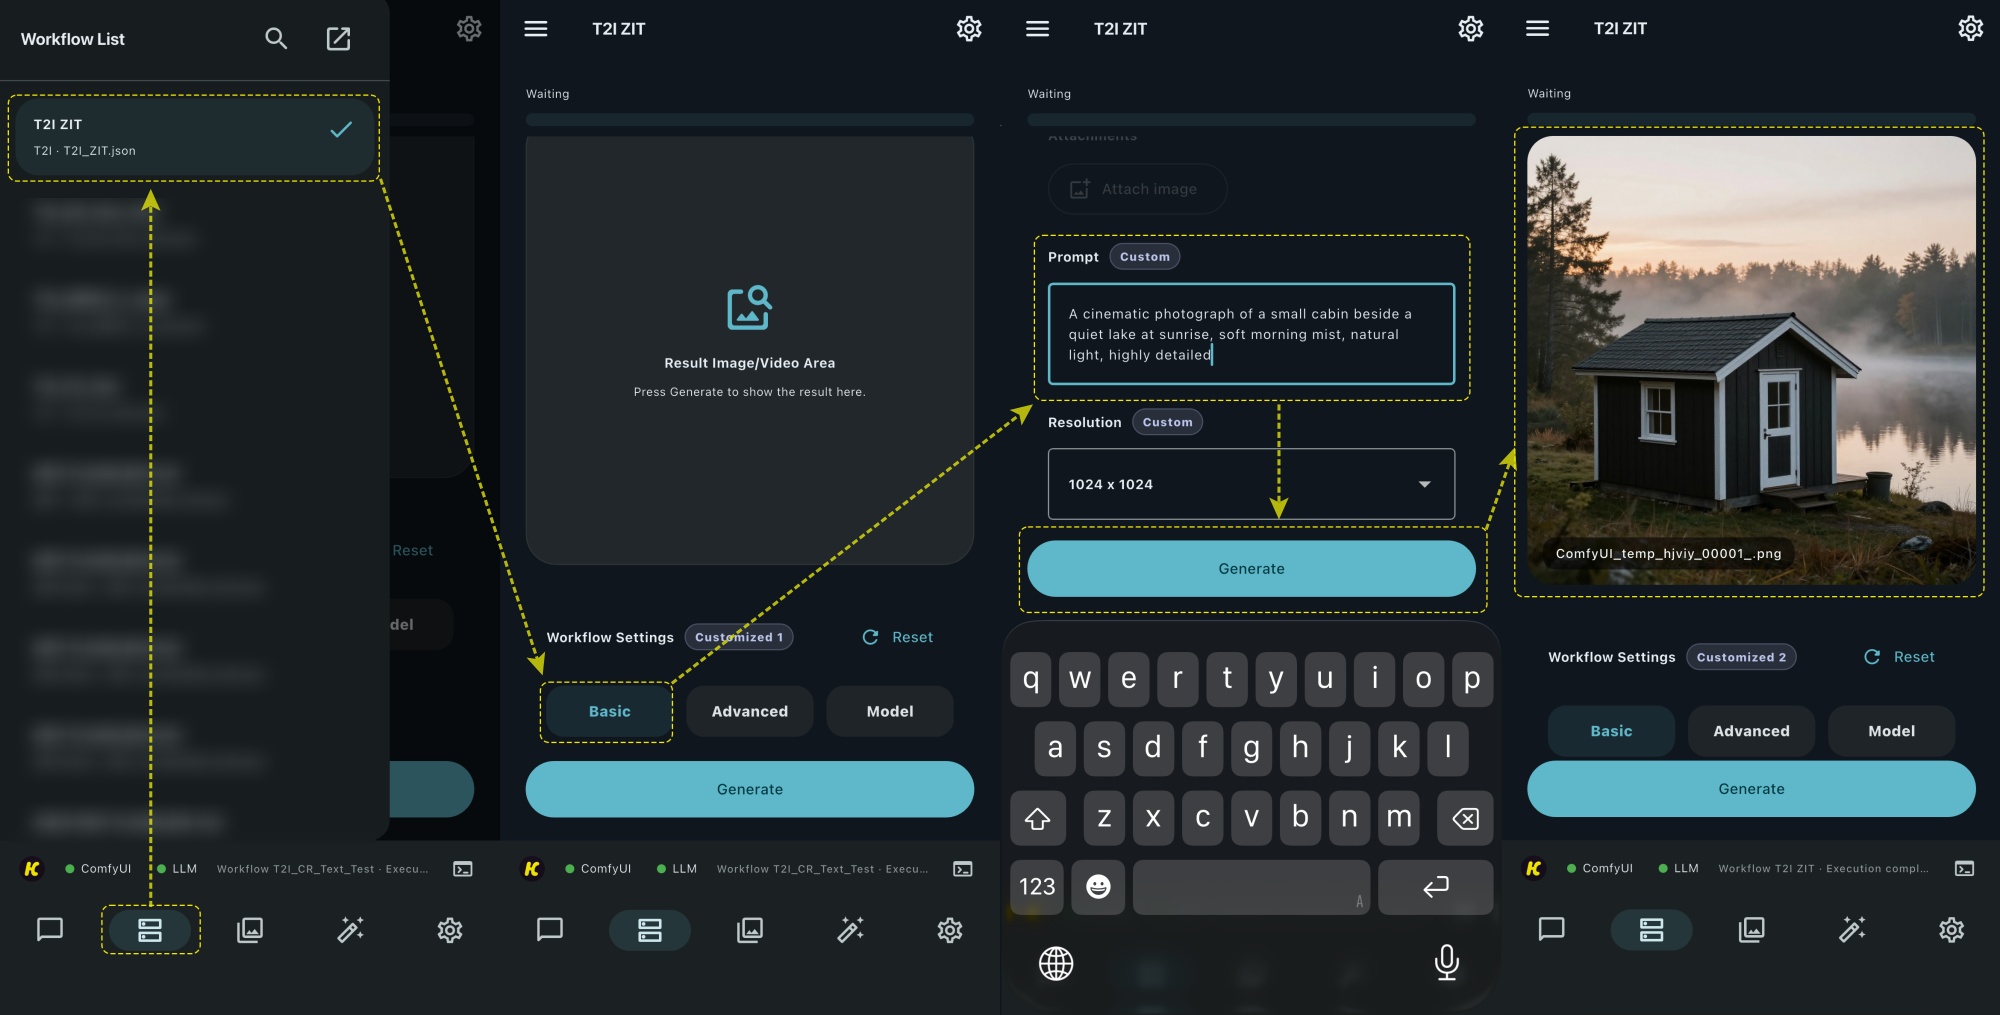
For the first test, it is usually best to leave parameters such as resolution, steps, CFG, sampler, and scheduler at their default values.
Tap Generate.
HandyComfy will send the workflow and your selected parameters to the connected ComfyUI server.
Your PC performs the actual generation using its GPU and installed models.
When generation is complete, the result will appear in HandyComfy.
Congratulations — you have completed your first generation with HandyComfy!
From here, you can try different prompts, parameters, workflows, and models.
3.3 Test Chat Mode
If you configured Ollama or an external LLM API earlier, you can also test Chat Mode.
Open Chat Mode from HandyComfy and select the LLM connection you configured.
Send a simple message such as:Write a detailed image-generation prompt for a futuristic city at night.
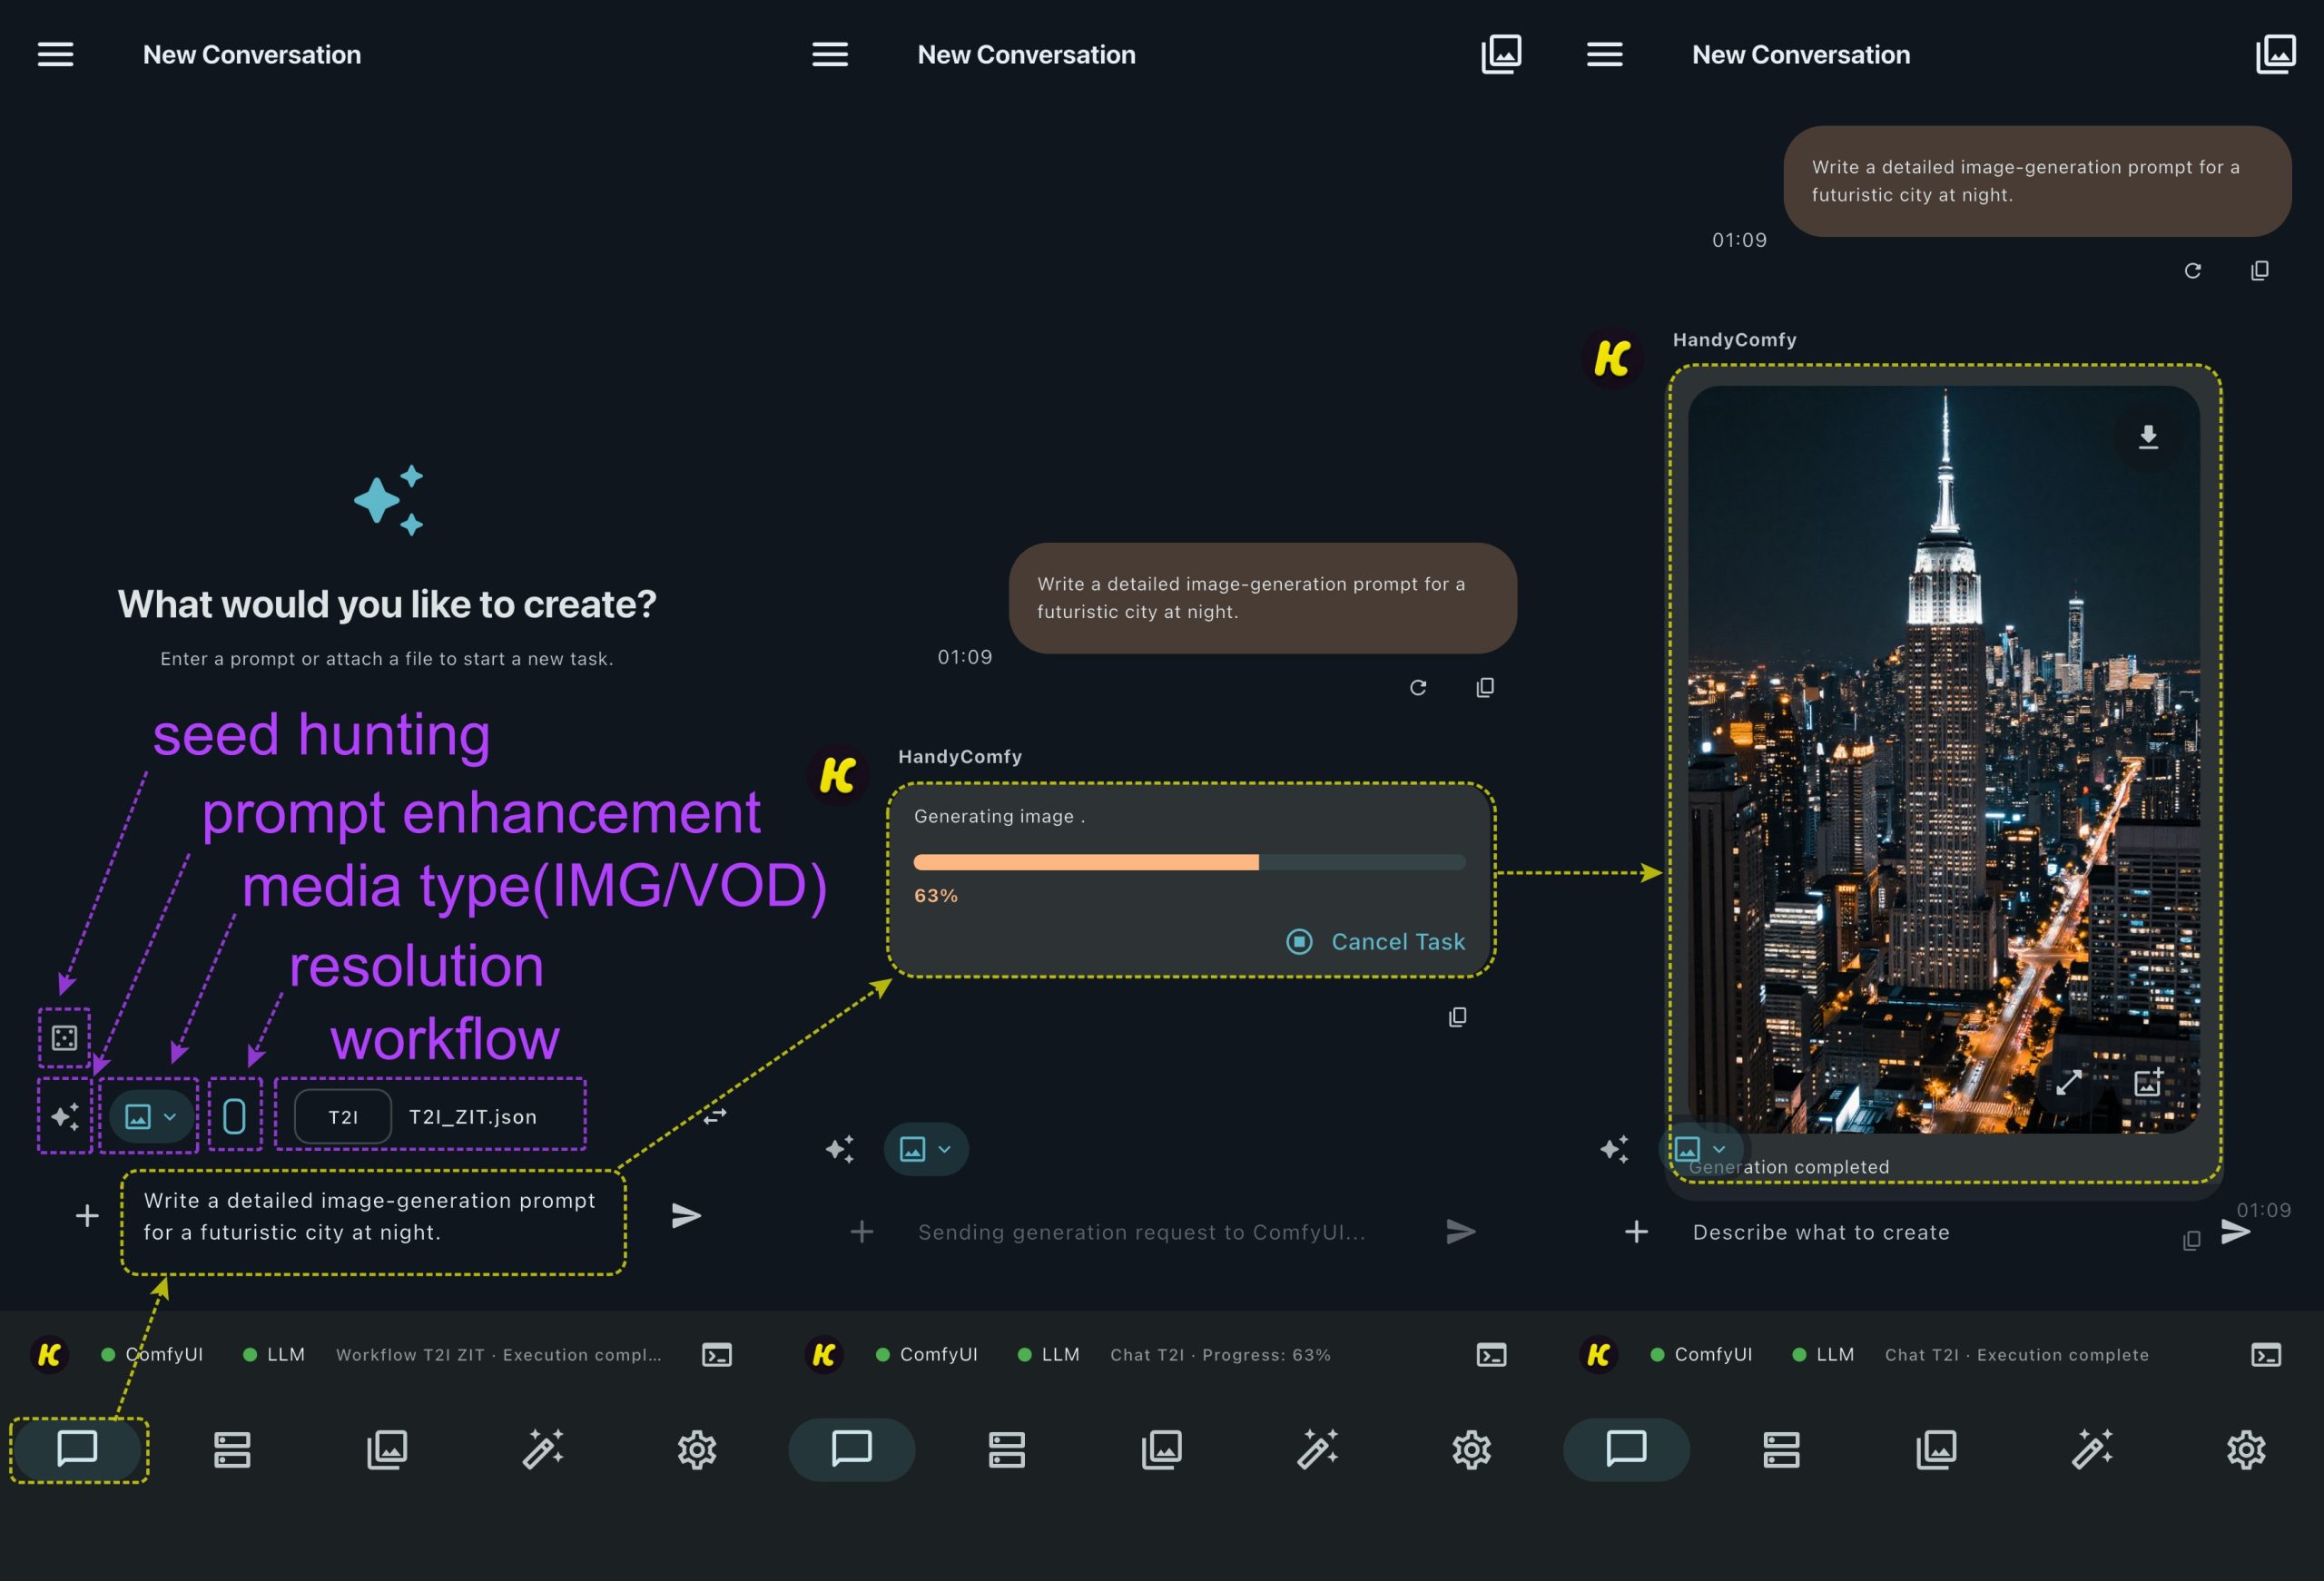
If a response appears, your LLM connection is working correctly.
If Chat Mode works but image generation does not, check your ComfyUI Server and Model Settings separately.
If image generation works but Chat Mode does not, check your LLM Server / API settings instead.
4.You’re Ready
Your basic HandyComfy setup is now complete.
You have:
Connected your phone to your ComfyUI server
Configured the models installed on your PC
Generated your first image
Optionally connected an LLM and tested Chat Mode
Next, continue to Basic Concept to learn how HandyComfy handles workflows, workflow controls, node naming conventions, and workspace profiles.